Each StorNext Connect workspace can have one NAS cluster (cluster). An additional workspace is required to connect an additional NAS cluster. See the Explore Components App page for further information. Only one NAS cluster can have a node that installs volume (file systems) from several workspaces.
To set up a NAS cluster, follow these steps:

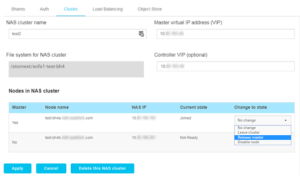
- To access the Build NAS cluster page, go to the NAS app’s main page and click Create NAS cluster.
- To create the NAS cluster, go to the StorNext Connect workspace.
- To recognize the NAS cluster inside the app, give it a name. Alphanumeric letters and dashes are acceptable values.
- Enter the primary virtual IP (VIP) addresses for the NAS cluster, which is used to manage NAS failover.
- Use a network and subnet that is the same as the NAS cluster & NAS clients. The active node will host the master VIP. The master VIP distributes services to the next accessible node if the active node becomes unavailable.
- Choose a disk (file system) for storing NAS cluster information that is available to all machines in the NAS cluster. You won’t be able to adjust the value later.
- In the StorNext GUI, make sure that file locking is enabled on the disk (file system). In the StorNext GUI, go to File Locking and enable it.
- Add a controller VIP for StorNext Connect to utilize to handle NAS settings if desired.
If the controller VIP is not defined or expires, the masters VIP is used. Also, if indeed the supervisor VIP fails, the IP address of the master node is utilized.
If your system has numerous network interfaces but StorNext Connect is on a different channel than NAS management solutions and NAS clients, you’ll need to install a controller VIP.
- To access the node selection table, click Add/Remove nodes.
- Choose the check box(es) for the server node(s) you wish to be part of a NAS cluster in the table.
- Select the chosen master node for the NAS cluster by clicking in the Master column.
- Just the master node’s pools are accessible when creating a NAS cluster with the server with shares defined.
Non-master node shares will not be lost, and they’ll be inaccessible from afar. The master node synchronizes its identity configuration to other nodes in a cluster when creating a NAS cluster of server nodes in which the security type has been defined. Select the NAS IP address for each node if your system has multiple network interfaces. Use a network and subnet that is the same as your NAS cluster’s masters VIP. Click OK once you’ve finished selecting servers for the NAS cluster. To save the setup and construct the NAS cluster, click Apply.
Create a NAS Cluster
Users may add only one NAS controller to a NAS cluster; you must set up two NAS controllers as just a NAS controller pair. If you need to repair a NAS controller, you may detach or reconnect a single NAS gamepad to a NAS cluster.
You will be prompted to approve a Patent License Contract the very first time you install a NAS cluster (EULA). You won’t be able to set up the NAS cluster until you agree to the EULA.
Prerequisites
Before you set up a NAS cluster, be sure to:
Ensure that network needs are met:
On the network switches used in the internal or SAN networks, enable jumbo frames.
On the same ports, enable flow control.
Check that the PS Series group’s storage pool has enough room to put the NAS reserves and client data. The NAS reserve comprises NAS client data that NAS containers can utilize, as well as provide more set aside for system use. Users can increase the amount of the NAS reserve non-disruptively after you set up the NAS cluster.
The NAS reserve cannot be reduced in size.
Check that you do have the following details:
Client network information to be assigned to this NAS cluster
Information about the SAN/internal network, including the quantity of reserved internal IP addresses (64, 128, or 256)
When you use the NAS program to create a NAS cluster, the app configures it using local security with the default administration user. The master node synchronizes its identity settings to other nodes in a cluster if authentication has previously been established for machines that will be members of a NAS cluster.
Before users access shares, we recommend establishing authentication once. Users will be separated from shares and will have to reconnect if the authentication type is changed later. Between both the new and prior authentication, files and folders generated in the share may have a conflicting owner, group, and access settings.