Swift is a powerful programming language that allows developers to create lightning-fast applications. However, like any other language, Swift also has its own quirks and pitfalls. In this blog post, we will share some tips to consider when initializing Swift objects.
What is a Swift Initialization?
When you create an instance of a Swift class, you automatically get a set of initializers that are called when the instance is initialized. These initializers can do all sorts of things, such as creating instances of optional types or setting global variables.
To get a better understanding of how these initializers work, and to see some tips for optimizing them, let’s take a look at an example. The following code shows the definition of a simple class called Person:
class Person { var name: String! }
The first thing that happens when you create an instance of Person is the constructor is invoked. This constructor takes one parameter, which is the name string that we defined in the class. Next, the init() method is called. This method is responsible for setting up our object’s properties and doing any other initialization that we might need. Finally, the deinit() method is called if we want to clean up after ourselves (in this case, by releasing any resources that we’ve allocated).
Now let’s look at some tips for optimizing your initializers. First and foremost, try to keep your code as concise as possible. If there are multiple lines of code that can replace one another without causing any problems, use those lines instead. Also make sure that each line of code does what it needs to do without unnecessary complications or overhead. And finally, be sure to test your initializers before you deploy them into production!
What are the benefits of a Swift Initialization?
Swift Initialization can provide several benefits. These include speed, memory usage, and reduced chances of errors. Additionally, initialization can help to keep code organized and manageable. Here are a few tips to consider when implementing Swift initialization:
- Use automatic variable initializers whenever possible.
- Prefer constant initialization values over initalsized variables or functions.
- Keep your code as short as possible by avoiding long initializers if possible.
- Avoid using instance variables for initializers; use class properties instead.
When should you consider a Swift Initialization?
When you’re developing an app or a game, it’s important to keep in mind the time-frame for which you plan to deploy it. If you have a tight deadline, then you might want to consider using Swift initialization techniques.
One of the fastest and most efficient ways to initialize an object is to use the init() method. This method takes no arguments and returns an initialized object. That means that all the properties of the object will be set to their default values.
If you need to initialize more than one property on an object, then you can use the init(…) method instead. This method takes two arguments: a closure that will be executed once the initialization is complete, and a dictionary of initial values for the properties.
These methods are great when your app or game needs to initialize only a few properties, but they can get complicated if you need to initialize more than a couple of them. That’s where functional initialization comes in handy.
Functional initialization works like this: You create an instance of an initialized object by calling its static init() method. This method takes no arguments and returns a new instance of the initialized object.
This way, you don’t have to worry about setting up any closures or initializing any properties yourself. All the work is done for you by the library or framework that you’re using.
How much does it cost to have a Swift Initialization done?
If you’re thinking about having your Swift initialization done, there are a few things to keep in mind. A Swift initialization can cost anywhere from $1,000 to $10,000+, depending on the size and complexity of your project. Here are some tips to help you decide if a Swift initialization is right for you:
-Ask yourself what you need the initialization for. Is it for performance reasons? To make your code more readable? If so, a basic initialization might be enough.
-Be realistic about how much work will go into setting up the initializer. It’s easy to get swept up in the excitement of having a new feature and overestimate how much work will be required to get it working.
-Think about whether you already have some of the necessary tools and infrastructure in place. Do you have an existing codebase that uses Objective-C APIs? If so, an initialization might not be necessary because Objective-C wrappers will already be available. On the other hand, if your codebase is entirely written in Swift, an initialization may be necessary in order to make use of some of its features.
-Consider whether there’s anything special you need from an initialization – such as custom compilation or assembly support – that isn’t available out of the box. For example, Microsoft offers custom assembly support for its development environment Visual Studio .NET, which is not included with Apple’s Xcode development platform.
Conclusion
If you’re like most people, you probably start your day by launching dozens of applications and then spending the rest of the morning trying to keep track of all of them. In this article, we’ll show you some tips on how to make your Swift initialization process more efficient so that you can spend less time trying to manage everything and more time doing what matters. We’ll also provide a few example swift initations to get you started. Thanks for reading!
FAQs
1. What is initialization in Swift?
Initialization in Swift refers to the process of preparing an instance of a class, structure, or enumeration for use. This involves setting up initial values for each stored property and performing any other setup or initialization tasks required before the new instance is ready for use.
2. How do you define an initializer in Swift?
Initializers in Swift are defined with the init keyword. Within a class or structure, you define an initializer to accept parameters, set up initial states, or provide default values for properties. For example:
class Person {
var name: String
var age: Int
init(name: String, age: Int) {
self.name = name
self.age = age
}
}
3. Can Swift classes have more than one initializer?
Yes, Swift classes can have multiple initializers. This allows you to initialize your class instances in different ways depending on the initial information available. Overloading initializers by providing different parameters sets is a common practice to offer flexibility in instance creation.
4. What is a convenience initializer in Swift?
A convenience initializer is a secondary initializer that must call another initializer from the same class. It’s marked with the convenience keyword. Convenience initializers are typically used to define additional, simpler or more specific ways to initialize an instance of the class.
5. How does initialization inheritance work in Swift classes?
In Swift, a subclass inherits all of its superclass’s designated initializers if it doesn’t provide any of its own. However, if a subclass provides at least one designated initializer, it doesn’t inherit any of its superclass’s initializers. Subclasses can also override a superclass designated initializer to provide custom implementation.
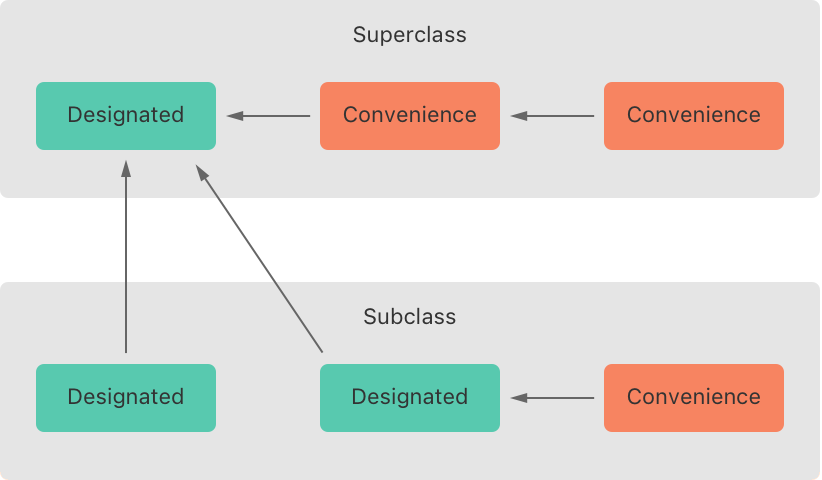
6. What is the difference between designated and convenience initializers in Swift?
Designated initializers are the primary initializers of a class. They fully initialize all properties introduced by that class and call an appropriate superclass initializer to continue the initialization process up the superclass chain. Convenience initializers are secondary, helper initializers that need to call one of the designated initializers within the same class.
7. How do you handle optional property types during initialization?
Optional properties in Swift are properties that can hold a value or be nil. They don’t need to be initialized within the initializer if they’re declared as optionals because they automatically initialize with a default value of nil. This allows for flexibility in instance creation when not all property values are known or required.