There can be several reasons why bugs can creep into your apps. A robust system must detect them and make suitable changes to the Play Store app to ensure it works properly. The Android Studio gives an advanced debugging feature. It permits developers to undertake the following activities:
- Create the breakpoints in Kotlin, Java, and C++ code
- Select the device where you want to debug the app.
- Examining the evaluated expressions and variables at runtime.
Enabling debugging
It is essential to know how developers can prepare for debugging the app.
Enabling the Emulator on the device
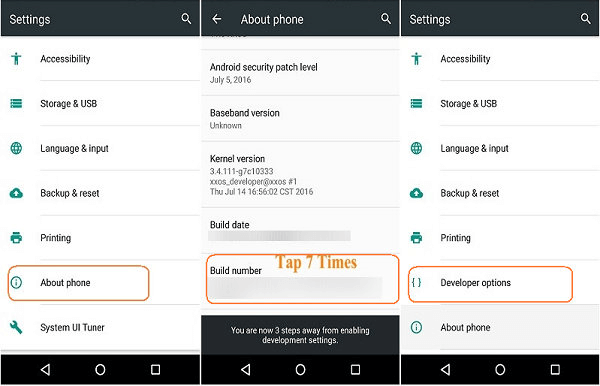
When utilising the Emulator, the debugger is allowed by default. However, for connected devices, allowing the debugger at the Device Developer option is essential.
Running a debugging build
The Build variant can be used, which has debuggable true in build config. Generally, selecting the debug variant by default is only sufficient, which is included across all Android development projects. If you want to define debuggable modern build types, it becomes essential to attach debuggable true to the build.
It can also apply to the C/ C++ modules. If the Play Store app is dependent on the library module, which you must debug, you must also package the library through debuggable true and ensure it retains the debugging symbols.
Starting the debugging process

The debugging process can be started with the below steps:
- Have some of the breakpoints set in app code
- At the toolbar, you must select the device where you wish to debug the app. It can be done from target device breakdown menu.
If there aren’t any configured devices, you must either create an AVD using the Android Emulator or connect a device via USB.
- At the toolbar, click on the Debug button.
On seeing a dialog requesting a response whether you switch “switch from Run to Debug,” the app is operating on the device. It must restart to begin the debugging process. You can have the same Play Store app instance running by clicking Cancel Debug. You can also attach the debugger to a running app.
Android Studio can build an APK, sign it with the debug key, install it on the chosen device, and run it. If your project has C and C++ code, the Android Studio can also run LLDB debugger in Debug window for debugging the native code.
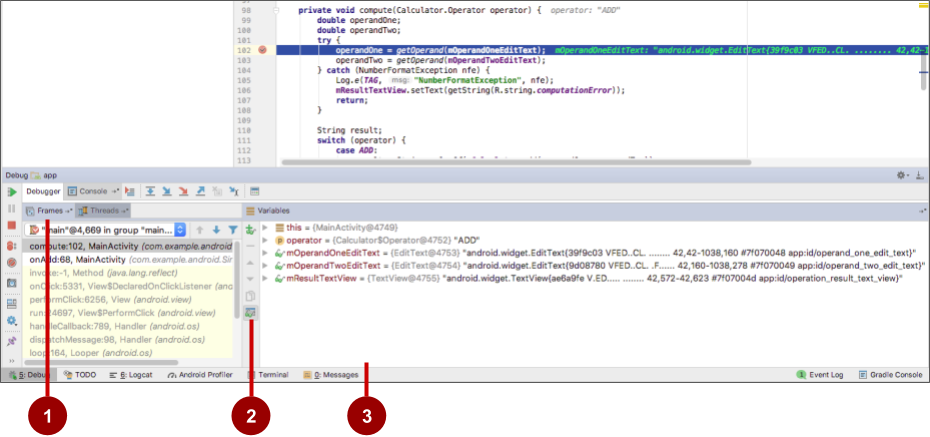
- In case the Debug window isn’t open, you can choose this option: View > Tool Windows > Debug (you can also click Debug at the tool window bar), and also click the Debugger tab.
Changing the type of debugger

Various debugger tools are needed to debug the C/C++ and Java/Kotlin code. Android Studio debugger helps choose which debugger type must be used. The Android Studio will default decide the debugger to use depending on the languages it perceives in the project.
Developers can manually choose the debugger in debug configuration. You can also do it in dialog selecting Run > Attach debugger for the Android process.
The available debug types are:
Auto
You can select this type if the developer wants Android Studio for choosing the finest alternative for debugging the code automatically. Android Studio can automatically use the Dual debug type if there is any C / C++ code in the project. Else, Android Studio can use Java debug.
Java
You can select this mode to debug the code that you can create in Java or Kotlin. The Java debugger will ignore breakpoints or watch the setting of the native code.
Native (available only with C/ C++ code)
You can select this mode if you use the LLDB for debugging the code. Java debugger session view isn’t available. LLDB will inspect only the native code by default. It disregards breakpoints in the Java code. If you must debug the Java code, you must move to either the Dual or Auto debug type.
Native debugging will work on the devices with these prerequisites:
The device must support run-as.
You can assess whether it is possible. Run this command on ADB shell linked to your device:
run-as your-package-name pwd
You can change your-package-name with the Play Store app’s package name. In case the device supports run-as, there shouldn’t be any errors.
ptrace is enabled on the device.
You can verify if ptrace is enabled by running this command on ADB shell linked to the device:
sysctl kernel.yama.ptrace_scope
If you permit ptrace on the device, the command prints the value 0 or return an “an unknown key error”. If it doesn’t support, it will return a value other than 0.
Dual (presented with C/C++ code only)
You can select this option if you choose to toggle between debugging native code and Java. During Android development, attach the LLDB and Java debugger to the app process. Developers can inspect the breakpoints in native code and Java. They need not change the debug configuration or restart the Play Store app.
There are two tabs at the right of Debug window title. The app has C++ and Java code. Hence, one tab is to debug the Java code, while the other debug the native code.
FAQs
1. What is the debugger in Android Studio?
The debugger in Android Studio is a tool that allows developers to examine and modify the state of an Android application’s code at runtime. It provides features like breakpoints, step execution, variable inspection, and log messages, enabling developers to track down and fix bugs more efficiently.
2. How do I start a debugging session in Android Studio?
To start a debugging session, you first need to set one or more breakpoints in your code. Then, click on the debug icon (resembling a bug) next to the run button in the toolbar, or press Shift + F9. Android Studio will build your project in debug mode and launch the selected app or module on your device or emulator, stopping execution when it hits breakpoints.
3. What are breakpoints, and how do I use them?
Breakpoints are markers that you can set on lines of code where you want the debugger to pause execution of your app. To set a breakpoint in Android Studio, simply click in the gutter next to the line number in your source code. A red dot will appear, indicating that a breakpoint has been set. The debugger will pause execution when it reaches any active breakpoint.
4. Can I inspect variable values while debugging?
Yes, when execution is paused (at a breakpoint, for example), you can inspect the values of variables in the current scope. In the “Variables” pane of the Debug window, you can expand variables to see their properties or values. You can also evaluate expressions on-the-fly using the “Evaluate Expression” feature.
5. What is step execution, and how do I use it?
Step execution refers to the ability to execute your program one line or one instruction at a time. This is useful for closely observing how changes in state affect your application. Android Studio provides several step commands:
- Step Over (F8): Executes the next line of code, but skips over method calls.
- Step Into (F7): Executes the next line of code and if the line contains a method call, the debugger enters the called method.
- Step Out (Shift + F8): Continues execution until the current method returns to the caller.
- Run to Cursor (Alt + F9): Resumes execution and pauses when it reaches the line of code where the cursor is located.
6. How do I watch expressions or variables?
In the Debug window, you can use the “Watch” pane to monitor the values of specific expressions or variables throughout the debugging session. To add a watch expression, right-click on a variable in the “Variables” pane or in your source code and select “Add to Watches.” You can also manually enter expressions in the “Watch” pane.
7. What are some tips for efficient debugging in Android Studio?
- Use conditional breakpoints to pause execution only when certain conditions are met, saving time when debugging complex issues.
- Log messages can complement debugging by providing insights into the app’s execution flow or state changes.
- Take advantage of the ‘Evaluate Expression’ tool for testing how code changes might behave without having to modify and rerun your app.
- Customize the debug view by rearranging panes and settings to suit your workflow, making information more accessible.