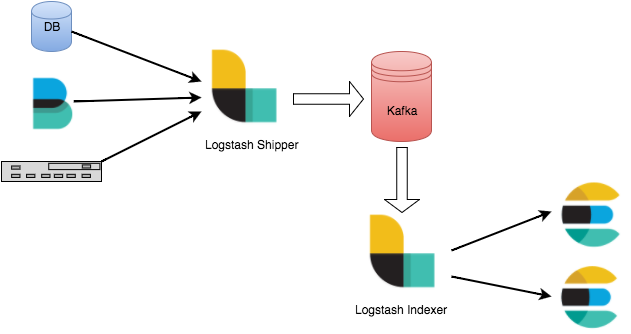
Any production problem quickly becomes frightening when your logging infrastructure becomes overwhelmed, and you cannot generate relevant data. You should employ a buffering technique if you’re sending your logs to Logstash over Beats. The ideal strategy to implement the ELK Stack to prevent log overload is to use Kafka as a buffering across from Logstash to guarantee robustness.
Many people new to information science are stumped after writing their initial Python and R script. While that web crawler may have performed admirably on your laptop at one point, you should consider a stream architecture that can manage many datasets. To derive relevant findings, you must not only save the results but also visualize them, as well as change and integrate the data. A useful model of the data is to think of it as a stream into which you may pump various datasets. You’ll also want to design a flexible, pluggable, and reusable solution.
What is the best solution to offer?
The most frequent buffer solution used with the ELK Stack is Apache Kafka. How and when to deploy all the elements needed to set up an adaptable logs pipeline of Apache Kafka as well as ELK Stack between the log delivery and indexing components, acting as a segregation component for the data is being collected: how to utilize all the parts required to start adaptable logs funnel with Apache Kafka as well as ELK Stack between the log delivery and indexing components, acting as a segregation unit again for data being collected
- Beats — Logs are collected and forwarded the a Kafka.
- Kafka — Queues and buffers data flows.
- Logstash – Collects, processes, and transmits data from Kafka topics to Elasticsearch.
- Elasticsearch is a search engine that indexes and maps data.
- Kibana – Pro end-user end user with a visual representation of the mapped data.
Prerequisite utilizing
Microsoft Azure VMs to build up the environment because I have credits in them that aren’t being used. On AWS EC2, you may do the same thing. I’m running Ubuntu 18.04 on a virtual machine. Ensure it’s on a Network Operator and correct Vne in Azure and a Public Subnet in an AWS VPC. For SSH & Kibana connections, add a Protection Incoming Rules on Port 22 (SSH) & 5601 (TCP).
I’m using Apache Access Logs for the pipeline, but you could also use VPC Flow Logs, ALB Entry Logs, and so on.
We’ll begin by installing Elasticsearch, the stack’s major component.
Use sudo privileges to log in to any Ubuntu system. To connect to a remote Ubuntu server via sash. Moreover, to log in to an Ubuntu system, Computer users could use putty or Powershell.
To run on any machine, Elasticsearch requires Java. Run the following command to ensure that Java is installed on your machine. The present Java version may be found using this command.
install openjdk-11-jdk-headless Sudo apt install OpenJDK-11-JDK-headless
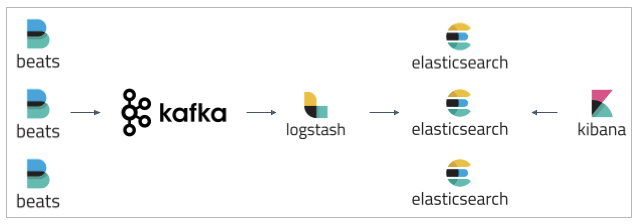
Image Source: Link
Step 1: On Ubuntu, install Elasticsearch.
To install Elastic on an Ubuntu Linux system, the Couchbase official company gives an apt repository. After that, install the packages below and import the GPG key for Elasticsearch.
The global signing key can be downloaded and installed here:
Before continuing, you might have to install the apt-transport-HTTP package on Debian:
/etc/apt/sources.list.d/elastic-7.x.list: Save the repository definition:
The Elastic Debian package can be installed with the following command:
sudo apt-get install query language && Sudo apt-get update
We should apply some basic configurations to use the Elasticsearch file type at: /etc/elasticsearch/elasticsearch.yml before we can bootstrap Elasticsearch.
su sudo
/etc/elasticsearch/elasticsearch.yml /etc/elasticsearch/elasticsearch.yml /etc/elasticsearch/
We’ll bind Elastic to localhost because we’re installing it on Azure/AWS. In addition, we must designate our VM/EC2 instance’s private IP as a maestro node:
“InstancePrivateIP>” as network.host
HTTP.port:9200
[“InstancePrivateIP>”] cluster.initial controller nodes
Save the file and start Elasticsearch with these commands:
service sudo start elasticsearch
Curl to http://localhost:9200 to test that something is working as designed, and you should hear that phrase: (Give Elastic a moment or two until you start worrying about this no response):
Step 2: Logstash Installation
The “L” in ELK — Best ones — comes next. Logstash is simple to use and set up. Input the command below.
install logstash -y sudo apt-get install logstash -y
We’ll then set up a Logstash pipeline to pull logs out of a Kafka topic, process them, and send them to Elastic for indexing.
Let’s make a new configuration file:
/etc/logstash/conf.d/apache.conf sudo nano
We’ll then set up a Logstash pipeline to pull logs from just a Kafka topic, analyze them, and send them to Elastic for indexing.
How to Setup Kibana?
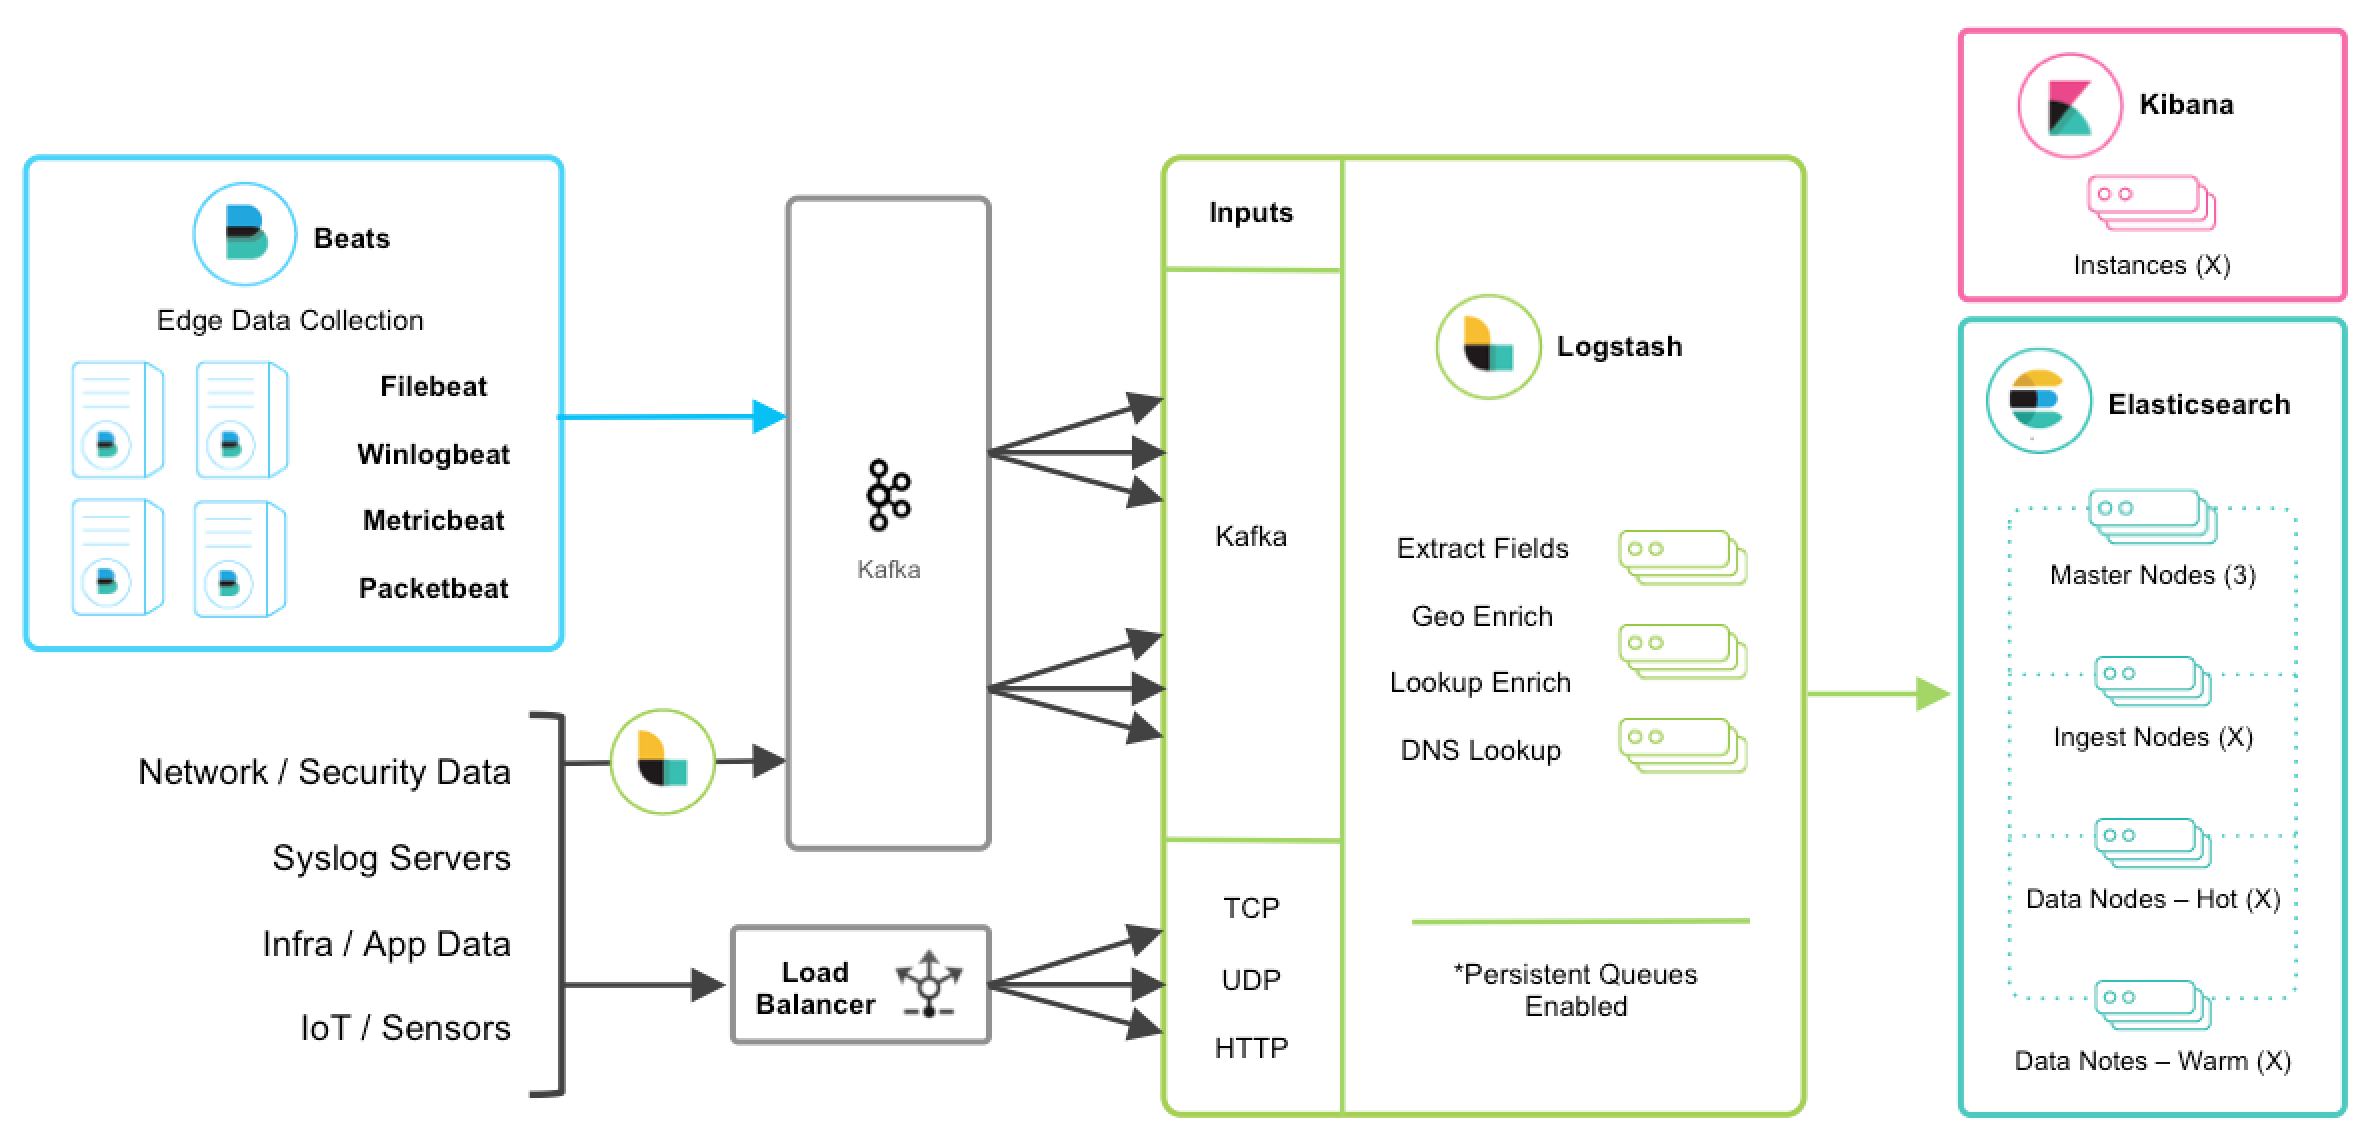
Image Source: Link
Let’s continue to ELK Stack’s next component, Kibana. To install Kibana, we’ll use the same easy apt command as before:
apt-get install kibana sudo
After that, we’ll open the Kibana file name at /etc/kibana/kibana.yml and double-check that the following configurations are defined:
5601 is the server’s port number.
“INSTANCE PRIVATE IP>” as a server. Host.
[“http://INSTANCE PRIVATE IP>:9200”] elasticsearch.hosts
The Kibana service must then be enabled and started:
activate kibana with sudo systemctl
sudo systemctl kibana start
We’d have to set up Firebeatz. Use:
filebeat sudo apt install
EKK Stack and More in the Technology Stack
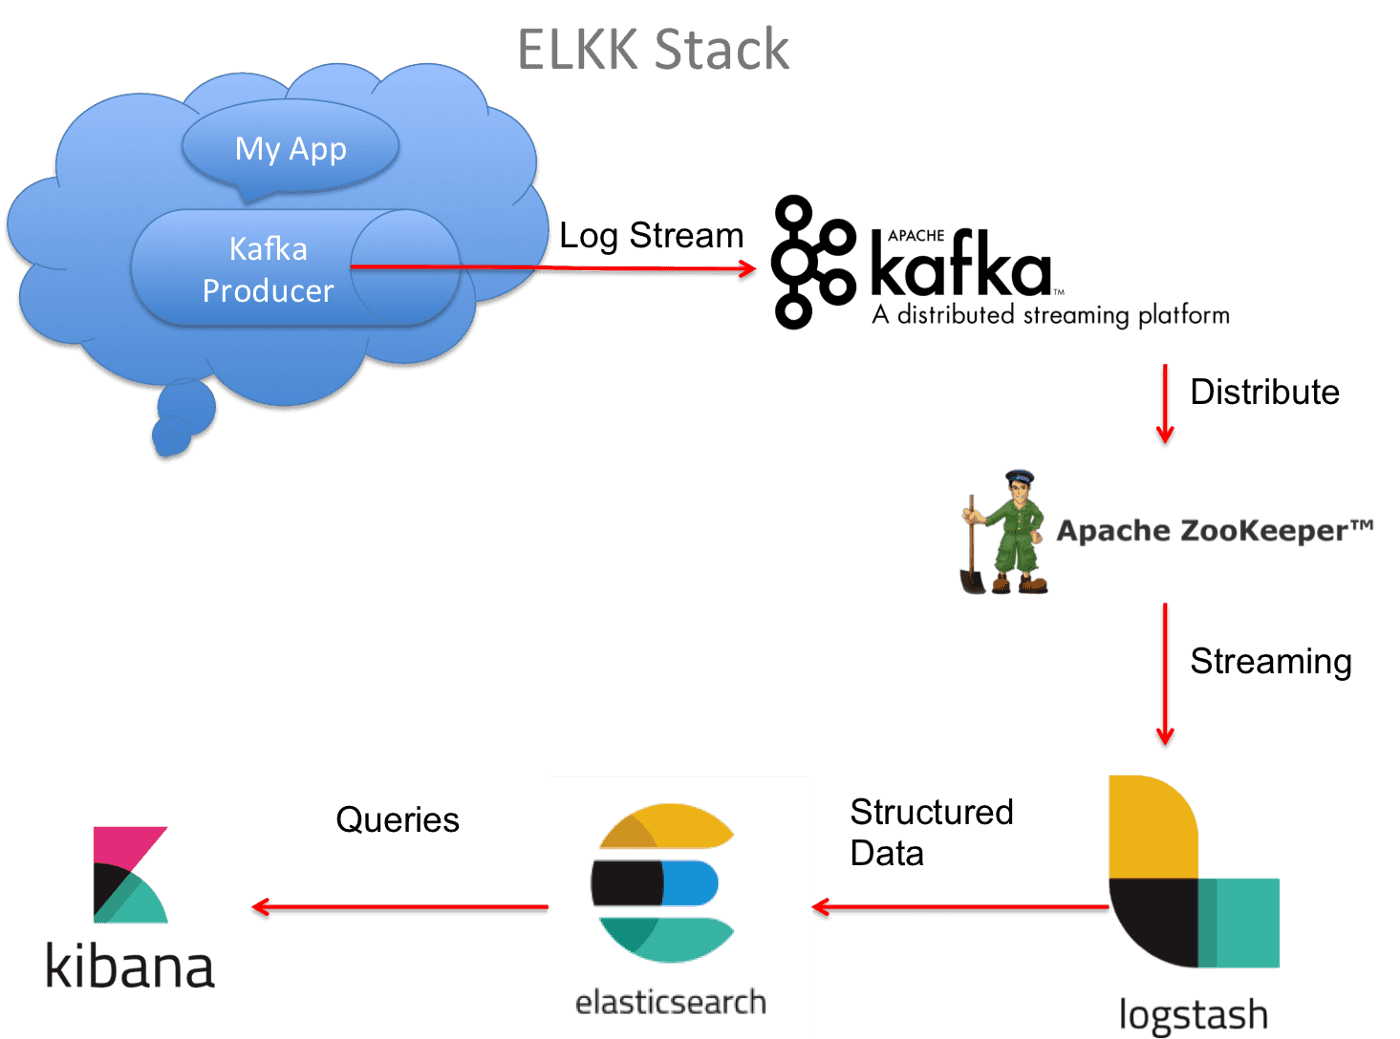
Image Source: Link
Python is the norm today for most projects. Kafka is a stream platform/application messaging/distributed transaction log that is the industry standard. Kafka Connectors: Connectors allow us to transport data between different data systems clean and low-maintenance manner. Data is pulled from REST API and then stored in Kafka using a REST connector. Elasticsearch Sink Connector: reads Kafka data and stores it in Elasticsearch. Elasticsearch is a big data pattern identification and visualization engine that is probably the global open-source standard. Elasticsearch’s main visualization engine is Kibana.
Integrating Kafka with ELK Stack: Benefits and Use Cases
Kafka and the ELK Stack are two powerful tools separately, but when they’re combined, they offer enterprise-level solutions to companies with significant data streaming needs. Combining Kafka and ELK can provide benefits such as improved scalability through concurrent processing of streaming real-time data from multiple sources, centralized log collection for easy access and analysis, correlated log analytics in real-time for enhanced visibility into system performance problems, automated anomaly detection to identify trends faster than manual searches can detect them, and improved security by filtering logs at the point of source. Use cases might include collecting diagnostic instrumentation events from production machines to assess overall efficiency or streamlining stock transactions on Wall Street by analyzing performances each trading day. In short, integration between Kafka and the ELK Stack enables enterprises to obtain maximum value out of their big data environment so that better decisions can be made more quickly.
Architecture and Components of Kafka and ELK Integration
Kafka and ELK integration allow users to aggregate huge amounts of data from multiple sources in real time. Combining these two technologies has enabled companies to build an integrated platform for collecting, streaming, analyzing, and monitoring large datasets. The architecture of the Kafka + ELK integration consists mainly of three components; Apache Kafka (message queueing system), Elasticsearch (index), and Kibana/Logstash (visualization).
Apache Kafka provides a reliable transport layer between producers and consumers responsible for message delivery. It also enables dynamic topic management, which helps maintain high throughput even under variable peak loads. Elasticsearch is used as the indexing engine that stores all incoming messages from various sources in their persistent store before they can be consumed by other applications or devices downstream in the pipeline. Lastly, Kibana/Logstash works as an efficient visualization tool to accurately display the stored message streams via interactive graphs and charts on a web interface such as Dashboards or Canvas Boards, among others.
Kafka Connect: Connecting Kafka with ELK Stack
Kafka Connect provides a powerful way to integrate data sources with Apache Kafka. It simplifies the process of connecting data from source systems such as databases, messaging systems and other applications into Kafka topics, making it easier for developers and enterprises to ingest real-time streaming data into an ELK Stack platform. You can configure various connectors within Apache Kafka that make collecting structured or semi-structured data easy. These connectors enable us to acquire datastreams directly from those certain standardized APIs and output them on outlined topics in Apache Kafka clusters.
Furthermore, they are integrated seamlessly into our ELK stack’s Logstash component allowing us to leverage our ELK solution without adding any additional components. With these advancements in technology more organizations can access actionable insights faster using near real-time logging built on top of Java open source technologies like SpringBoot, Lenses IO Platform instead of traditional ETL solutions when integrating new technologies together with their existing enterprise applications or cloud infrastructure development initiatives.
Data Ingestion from Kafka to Elasticsearch with Logstash
Data ingestion from Kafka to Elasticsearch with Logstash enables organizations to streamline their data pipeline and make insightful decisions about their data more quickly. Logstash can be used to read, parse, enrich and filter raw data from Kafka topics before it is stored in Elasticsearch for search and analysis. Ingesting the streaming raw data into Elasticsearch directly with Logstash has traditionally been difficult due to its lack of reliable connectivity between the two systems.
By ingesting the streaming Kafka log messages directly into an optimized distributed system like Elasticsearch, organizations can gain valuable insights in near real-time at scale. Additionally, companies also benefit from improved scalability when using this approach through elastic auto-scaling that provides consistent performance while still keeping costs low by automatically adjusting cluster sizes according to demand levels.
Not only does this reduce manual tweaking efforts associated with provisioning hardware infrastructure, but it also eliminates some of the complexity associated with configuring new nodes or clusters on a regular basis. Combining these components creates a powerful solution that makes obtaining accurate analytics faster and easier than ever before, thanks to automated processes such as backfilling missing documents or reindexing an index without downtime.
Conclusion
Implementing Kafka On Elk Stack is a tried and tested method for collecting log data from multiple different sources. Logstash accepts inputs from sources like Kafka, RabbitMQ, Beats, Syslog, or any other streaming source and forwards the messages to Elasticsearch for indexing. With this flow, users can collect large amounts of unstructured data quickly in near real-time so that they can take advantage of powerful search capabilities in a matter of minutes. Additionally, with built-in filtering options and mapping features within Logstash that allow users to select what specific elements are ingested into their clusters for storage and analysis using Kibana dashboards, businesses gain greater control over their log analytics pipeline. Finally, using the Elastic Stack’s ability to parse logs with Grok Patterns, organizations can easily structure semi-structured logs, making them easier to query when needed.